
Tags
art, Calico Critters, crafts, dollhouse, handmade, miniature, quilt, sewing, Sylvanian Families
I realized I haven’t done a dedicated tutorial before, yet have benefited greatly from what others have shared, so here is a short post on how I make tiny quilts. I’ve only made two simple quilts in this way (the one here and the one in this post), but it seems to work, at least for square-shaped patches. The first step, which may take longer than actually sewing the quilt, is deciding what kind of look you are going for. Is it a rustic patchwork quilt, or is it something with a pattern and specific color palette? I’d also suggest figuring out your dimensions at this stage by scaling down from real quilt sizes and sketching out what you want.
Selection of fabrics with small patterns is important for making the scale look right, and since I work in half (1:24) scale, the smaller the better. I tend to buy the right fabrics when I find them, even if I don’t have a use for them yet, since they are hard to come by and an eighth of a yard of cotton is cheap.
 Once your quilt is planned and with fabrics in-hand, it’s time to measure and cut your squares. I use a 1/8″ inch seam allowance around whatever final square size I want. In this quilt, I was making half inch squares with an added eighth of an inch all around. I grid out my squares by marking the backside of the fabric with a mechanical pencil before I cut out a bunch of squares at once. Don’t worry, the pencil lines will be hidden in the finished quilt.
 Each time you add a square, press the two edges you want to sew together with the backsides facing outward. The needle should pass exactly through the corners of your squares, where the pencil lines cross, and stitch evenly in small (1-2mm) stitches until you reach the next corner. Keep to your pencil lines on both sides, and it is better to stop a stitch early than a stitch late, since if you go too far and then backtrack later that extra stitch may show through on the finished quilt. When the fabric is turned right side out and the pieces of fabric are folded on their seams, no one will know a stitch was missing.
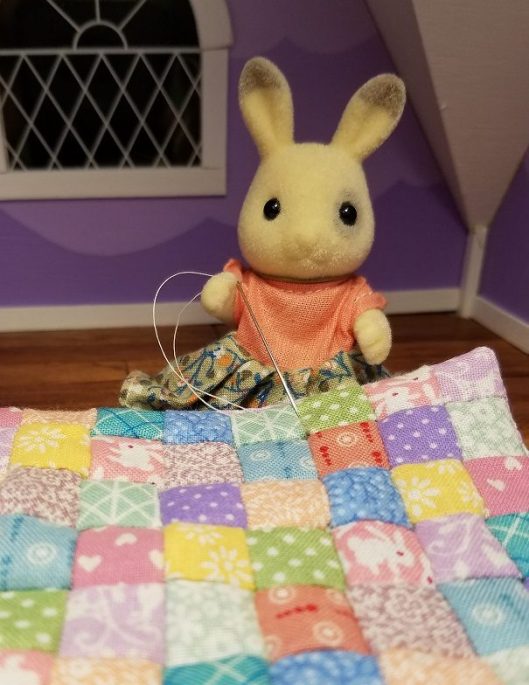
 To save on time and thread in this quilt, I was sort of random in how I added squares, instead of making strips or groups of squares and then stitching them together. I kept track of how many squares I had vertically and horizontally, and eventually all 100 squares were in place.
 To finish the quilt, spread the stitched fabric right-side up and iron it a little to make it lay flat. Cut a square of backing fabric in your planned finished dimensions with 1/8” seam allowance. Stitch the two faces together, all of the way around except for a gap on one edge long enough to let you flip the quilt inside out. I used a lot of pins and tacking stitches at this point to stretch out my springy, scrunched up front side to match its sibling.
Once flipped inside out, slip some batting (here I used no scrim cotton, about 1/8” thick) into the hole between the quilt faces. You may want to use tweezers or a long stick to make sure it gets all the way into the corners.
The last step is to seal the hole, by using a ladder stitch, like this one.
Pat yourself on the back, you just made a very nice coaster!
 Grandmother Hoppinset, usually a jovial soul, disapproves of that last remark my husband made. She instead says good things take time and care.

Pingback: Miniature Quilt by Elizabeth Bradshaw - Mimi's Little Sylvanian Town
Pingback: ミニチュアキルト by Elizabeth Bradshaw - 灰みみのシルバニアタウン作り